
If you’ve been following this blog, you have probably read our recommendations for computer upgrades that provide the most bang per buck. Of those, you should know that installing an SSD drive is currently the single upgrade that will provide the most significant performance improvements.
The problem being – when it came to upgrading a laptop this would imply having to choose between the higher performance of a SSD and the higher capacity of a conventional HDD.
Well, this article will show you how to easily get around this choice by swapping out your optical DVD drive rather than your HDD, to make room for installing a SSD. Doing so, you’ll effectively get to keep two separate disk drives in your laptop: your current HDD plus a state of the art SSD. This upgrade can be easily done by getting hold of a simple SSD caddy that fits in the place of your DVD drive; the present article will guide you through the procedure as well as helping you evaluate the pros and cons.
Why consider doing this upgrade?
SSD drives are the new generation of computer storage devices. Being much faster (up to 10x as much) these drives will eventually replace standard HDD’s; the only reason this hasn’t happened yet is the cost, which is also around 10x as much. So, what many people are doing these days is combining a blazing fast SSD of limited capacity to keep all the system files, along with a conventional HDD for extended storage.
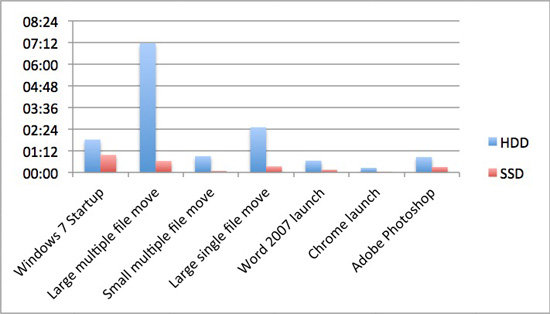
Using an SSD as the main drive will bring definite and drastic improvements to your machine: your boot time will drop down to a third, as well as the time it takes to load heavy programs. Suffice to say, if you own a laptop that is 2-3 years old that is starting to show signs of age, installing an SSD will make the machine feel more responsive than when it was brand new. Here, the following graphic should help put things in perspective:
What items are needed for this upgrade?
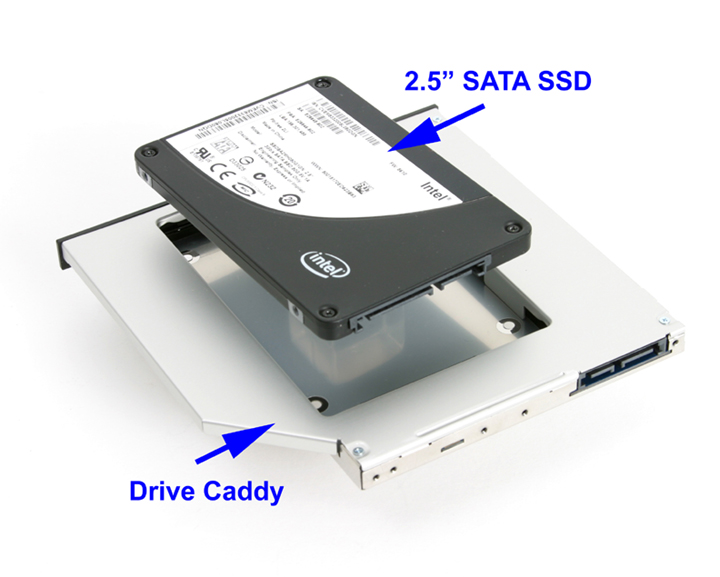
To perform this upgrade, you just need a SSD caddy (which you find this part on-line or in any computer store, these days) and a SSD drive
to go with it. The caddy is supposed to fit snugly in the place of your current DVD drive, so you should make sure to get one of the exact size as the bay where your laptop’s DVD is currently installed.
In most modern laptops, removing the DVD drive won’t even involve any dis-assembly of the chassis. You usually just have to remove two or three screws that can be accessed from the outside, and the drive will come out easily. It’s probably a good idea doing so to begin with, so you can register the exact dimensions of the drive, and get a caddy of the exact same size.
Additionally to the caddy, you’ll of course need a SSD drive. Here too, it’s important to check the exact dimensions, since these disks come slightly different sizes. If you don’t have the willingness or inclination to figure this out for yourself, you can just take the laptop to the shop and they’ll handle everything for you. However, this is such a simple upgrade that you can just get the parts and do it yourself, if you’re up for a DIY experience.
Additional considerations
Asides from getting the caddy and SSD and making sure they fit in one another and into the DVD drive bay in your laptop, there’s another important consideration: which SSD to get? The price per gigabyte on these disks can vary somewhat wildly, depending on the performance, size and build quality. With that in mind, you should spend some time looking for the right SSD for you.
One of the main considerations here is whether to get a Sata-2 or Sata-3 drive; if your laptop supports the latter, you might as well go for it to get the most performance possible. These are the latest generation of SSD drives, but since not all laptops can use their full potential… it’s sometimes better to just stick with an older Sata-2 SSD of higher capacity and lower cost. These will still be MUCH faster than any HDD out there.
Also, what size SSD should you get? For most, the sweet spot between price and storage space is around 128-258GB, with a cost in the $100-$200 range. If you’re on a budget, you can go for a smaller SSD; as few as 64GB should be enough to hold your system files and main applications comfortably, or even fewer depending on your usage patterns.
Another aspect you should consider is whether you will manage without the DVD drive in your laptop. For most people, this shouldn’t be a problem though… and there’s always the possibility of getting an external DVD caddy to slip your DVD drive into, which will effectively turn it into an external USB-powered DVD.
Finally… remember that to benefit from the drastic performance improvements of a SSD, you have to use it as the main system disk. To do this, you can either re-install your Operating System and start fresh, or use a disk clone tool to migrate your system from the current HDD to the SSD you’ll install.
Hey Great tip about switching laptop which i have an problem while doing this before may be would like to check it again
I am glad you like the tip Shameem! It can really help a slower computer. Thanks for stopping by 🙂